SlotForum banner

Adjustable Garvic chassis

3.9K views 32 replies 6 participants last post by  Houses  
#1 · (Edited by Moderator)
Hi everybody. I have recently bought this Garvic chassis


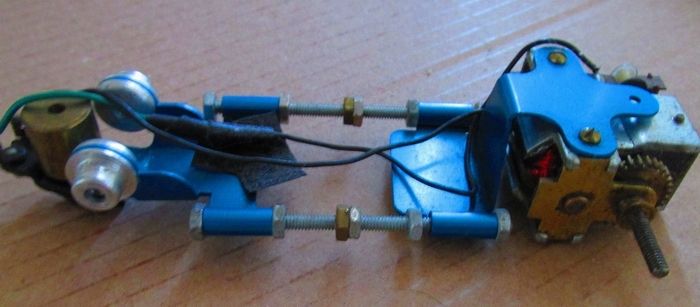
The aluminium pieces at the front are not oilites, but are 5-40 threaded. They seem to be original fitment. Does someone know if Garvic produced some kind of front axle (probably split) for this chassis, or may provide a copy of the original instruction sheet to see which was Garvic's recommendation about? There is a similar Garvic chassis for the Bonner motor that comes with ordinary oilites, but I can't imagine what was intended to be done with these threaded pieces. (Cutting an ordinary axle in two and installing free wheels retained by collars on the outside may be a solution, but it don't seems to me neat enough for being the factory recommendation)

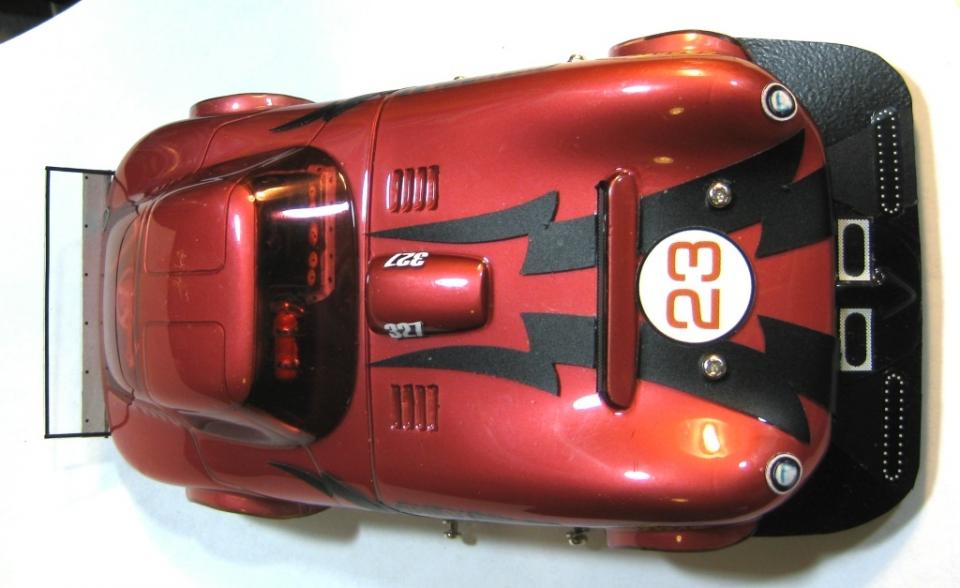
Needless to say, any advice will be greatly appreciated. I would like to build up a car keeping as close as possible to what could have been done at the time, so any advice about suitable bodies will also be very welcomed.

Cheers,

Eduardo.
 
#2 ·
Hello Eduardo,

Though incomplete those fronts are GarVic. They were sold separately as independent fronts. Very complicated and 'klugey'. They were sold bagged and stapled to a header card. AND .... GarVic did not include instructions in the package.

I'll post a picture (somehow) of a NOS set.

If you don't see it pop up ... PM me.

Gator Bob
 
#4 ·
Your welcome,

I looked just looked through three boxes of NOS wheels and tires and came up empty.
Image


Now I'm obsessed with finding them, they are so complex,
Image
there must be 10 or 12 pieces to assemble. I never opened the package to test fit all that 'stuff' together ... but now I want to, because I've never seen them on a car before ...LOL

note: 'Instructions not included'.

Straight axle and bushing or bearings would be the way to go.

What is showing on the car is missing lots of parts, IIRC those are two of six hub like gizmos.

Can't tell ... Is that a Strom, RAM or Pittman motor?.

Don't expect it to handle very well but with the treaded rod center section it has vintage dragster written all over it.
Image


I'll post a picture if they turn up, it'll leave everyone scratching their heads thinking....hmmm... What the farfallonious! were 'they thinking'

"You need any ting, gimme a shout"
Image
 
#5 ·
Looking forward to see these pictures... Your comments about the complexity of that front end just increase my interest.

The motor has no marks on it. Strombecker's Devastator has he axle the other way, so maybe RAM 426 or Pittman 704; judjing by the pictures I have of them, probably the former.

Yes, it has a dragster look, and also the weight distribution, with all the motor weight on the rear axle, is good for a dragster; nevertheless, just by that, maybe it would need a drop-arm. I'm sure you know better, I have never been on slot dragsters.

Eduardo
 
#7 ·
QUOTE (Houses @ 14 Apr 2016, 15:08) <{POST_SNAPBACK}>Looking forward to see these pictures... Your comments about the complexity of that front end just increase my interest. The motor has no marks on it. Strombecker's Devastator has he axle the other way, so maybe RAM 426 or Pittman 704; judjing by the pictures I have of them, probably the former. Yes, it has a dragster look, and also the weight distribution, with all the motor weight on the rear axle, is good for a dragster; nevertheless, just by that, maybe it would need a drop-arm. I'm sure you know better, I have never been on slot dragsters. Eduardo

Now, let's see if we can get back on track

With longer threaded rod (wheelbase) and that 'monster' flag weight you most likely would not need a drop arm set-up.

The 426 motors run good, the dual motored car* I built with them has green wire on the arm ... 9 volt rated IIRC. The XL-500 has red wire and is 3 pole. Is yours 3 or 5 pole, can't tell in the pic..

I'm _____ off that I can't find that package. You know ... it'll turn up when I'm looking for something else.
Image


*

Image
 
#8 · (Edited by Moderator)
Looks more like a Pittman DC704 to me, the first of these kinds of motors... seems one difference is the Pittman wires were soldered to the comutator and the Ram wires were welded...

Don't remember seeing these particular GarVic wheels and setup, so yep, I'd like to see those photos too!

Don

PS: just looked at the only GarVic catalog I have, probably from 66, since it lists the Firebird, Ocelot and Coronado.

It lists your chassis as No. 3104 with independent front axles, but the drawing doesn't show anything except what you show - still not sure why they're threaded!
There's also a listing of and independent axle adapter kit, No. 201 - and again a drawing that looks like your front end!
 
#11 ·
That chassis looks impressive Professor. Also quite different from the standard look for a dragster, due to the 4WD.

Good to know these reference numbers Don. Here are three views of the motor. Hope they may help identifying it!


Afer seeing your last posts Don: These leaflets are great. Indeed, I can do something similar, just have a unuseful brass 1/8" axle which will make it easier. Will look on my boxes for a couple of suitable non-threaded rims and start thinking about a body (deciding that may take a while!).

Thanks to both of you for all.
 
#12 · (Edited by Moderator)
QUOTE (dgersh @ 14 Apr 2016, 18:07) <{POST_SNAPBACK}>Eduardo, I did find a page of GarVic products from the May 64 issue of Model Car Science. Doesn't really look too complicated - cut a small threaded axle in half and solder a washer on the plain end! Now I'm more curious than ever to see Bob's wheels! Don

The bottom left. That's only half of what is in the kit ... from memory, 2 of those alum hub thingies, 2 alum 'domed' things, 2 'bolts', 5/40 nuts, tin 'pal' nuts ... and more! lol

Second picture down on the right showing the same chassis and that's the independent front kit installed less spacers and wheels. The 'bolts' are basically the same 5/40 as was used on the Dynamic 1/8" ind. front end.

So... it looks like the hub thingie fits in where the bushing goes and the domed thing goes on the opposite side. The hex head bolt head retains the wheel 'sold separate' (?) Those bronze bushing o-ring drag wheels are 'sweet' .. concentric and roll smooth on the axle.

Don .. Thanks for posting the mag pics. Hope to find that set when I'm looking for something entirely different.

houses .. you're good to go with a correct original set-up. Just need the 'bolts' ... I think I have a pair of the Dynamic version ... goin' lookin' Find'em and they're yours.
 
#13 ·
Many thanks for the offer Professor, but fortunately there is no need: your mention of Dynamic ringed a bell, I checked my Dynamic stuff and I alrady have one of these Dynamic 680 front ends with the bolts and free wheeling rims. Great you remembered Dynamic made a similar arrangement! Will post pictures once I have the car build-up. Many thanks to all for the advice.

Cheers,

Eduardo
 
#15 ·
QUOTE (Houses @ 16 Apr 2016, 04:28) <{POST_SNAPBACK}>Many thanks for the offer Professor, but fortunately there is no need: your mention of Dynamic ringed a bell, I checked my Dynamic stuff and I alrady have one of these Dynamic 680 front ends with the bolts and free wheeling rims. Great you remembered Dynamic made a similar arrangement! Will post pictures once I have the car build-up. Many thanks to all for the advice. Cheers, Eduardo

Way to go !
Image


Not sure if the Dynamic bolts are the same length but they should work out ok as the threaded portion is the track width adjustment.
 
#16 · (Edited by Moderator)
Oh yes, they work fine. Have installed them and the Dynamic rims, using brass spacers instead of the horrible press-on wheel retainers provided by Dynamic. After that I can't resist the temptation of posting a couple of pictures


Maybe isn't the fastest chassis, but by sure it's among the nicest. By the way, I'm realizing (quite late probably) that I'm becoming a slot chassis collector rather than a slot car collector. Not sure if such a pathology would need some professional attention... Found what seems to be a suitable body also


Anyway I'm open to other suggestions. Thanks for identifying the motor Don.

Cheers,

Eduardo
 
#17 ·
Nice project Eduardo. Does this mean you're also being tempted by 1/24? I thought you were mainly focused on 1/32...

The only problem I see here is how on earth to mount that body? That's always a problem with the aluminum chassis; guess you'll have to bolt on a couple of brass body mounts, or something like that...

Don
 
#18 ·
Great to see it coming together for you. Cleaned up real nice.

It looks well balanced with the heavy motor in rear and 'monster' guide weight in front. If you can get the car low... at least below 1/8" it should handle pretty good for such an old girl.

First thought on body mounts
Image


1/8" brass tube on the threaded rod, jammed by the nuts, Dynamic body mount #401 set, two screws and nuts to hole the mounts together parallel, Set your body width, solder mounts to tubes, run two pin tubes across, solder and trim ... done lol

Can't go wrong with a Cheetah
Image


Image
 
#19 · (Edited by Moderator)
Yes Don, I'm mainly on 1/32...In theory! The fact is that also have a few 1/24, mainly vac bodies with interesting chassis. Not so attracted by plastic 1/24, don't ask me why!

Regarding the body mounts, its interesting to see how most of the chassis makers (Kemtron, Buzco, Garvic, Rail-line, K&B...) provide nothing to mount bodies to their chassis. I have a small collection of build-up aftermarket 1/32 chassis paired to vac bodies and in almost all cases have had to imagine some solution to mount the body. In the present case what I had in mind was quite similar to professor's advice above (thanks for it Gator): 1/8" tubes on the threaded rods, a transverse brass strip soldered to them and then a couple of standard (Dynamic or so) brass body mountings screwed to the strip. Will do some trial...