

Another beautiful loser (sometimes called tipo152).
![]()
![]()
Photos are from leMans -64.
If anybody should be interested, the full story of these cars can be read here: http://www.theautochannel.com/publications/magazines/sci/apr-may-97/maserati.frame
I don't really trust the plan view I have found on the web, but you can find plenty of period photos.
The lime wood shell is made much the same way as I did the Maser Zagato 450s coupe last year, so no need for an endless build thread again.
We can move on a little quicker, at least for a start...
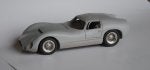
Some pics of the work so far.
![]()
![]()
![]()
![]()
I am going for the cut up version with a "skylight", not the alu-silver prototype.
This is where I am at present.
![]()
![]()
![]()
Very soon I will have to take a break. I need to figure out how to go about with the curved windscreen.
I don't do vac forming, it would take me long to build a former and learn how to.
It would also take long to cut up 684 PET-bottles trying to find the right shape...
Any idea or advice?
Cheers Carver


Photos are from leMans -64.
If anybody should be interested, the full story of these cars can be read here: http://www.theautochannel.com/publications/magazines/sci/apr-may-97/maserati.frame
I don't really trust the plan view I have found on the web, but you can find plenty of period photos.
The lime wood shell is made much the same way as I did the Maser Zagato 450s coupe last year, so no need for an endless build thread again.
We can move on a little quicker, at least for a start...
Some pics of the work so far.


I am going for the cut up version with a "skylight", not the alu-silver prototype.
This is where I am at present.


Very soon I will have to take a break. I need to figure out how to go about with the curved windscreen.
I don't do vac forming, it would take me long to build a former and learn how to.
It would also take long to cut up 684 PET-bottles trying to find the right shape...
Any idea or advice?
Cheers Carver


