SlotForum banner

Beginners Guide To Routed Track

70K views 114 replies 40 participants last post by  tomato_007 
#1 ·
Hi freaks,

browsing this and other forums I found lots of people wanting their own routed track, often asking themselves about costs, personal ability and how to do - in the end often leaving it undone.

This project is thought to show how easy it can be to build a cheap, uncomplicated little scenic track for tons of fun; from the beginning to the end. It is based on a little track (you know I like these) for my own use, a lets call it a "Cruise-o-rama" for recreational slow-motion-slotcarcruising
. Showing the techniques I typically use, pointing out hints and fingertips should help to show how and avoid mistakes I made for others. Special parts of the experiment are to keep the costs low (less than 50.-Euro
) and to keep it lightwight to make it easy to stow away.

But, main thing is: Everybody here should feel free and is asked to add own ideas, techniques, hints and everything that could help a newbie to get his/her own track finished. Thus hopefully leading to a really useful guide and should give a great overview of the "state of the art". On the other hand everybody should feel free to ask if something remains unclear!

So, welcome to the experiment, lets have fun. Regards Jens
More to follow.
 
See less See more
2
#2 ·
Great idea Jens! Cheap, simple and portable are the key to many of us, particularly those without the luxury of loads of space. I'm looking forward to the learning experience


I'll also happily offer any ideas/thoughts/techniques. I'm a real novice but, having started from scratch as a complete beginner just a year ago, there are several "mistakes" that I've learnt from along the way and a few things I've needed to work out for myself. More than willing to pass on my limited knowledge.
 
#3 · (Edited by Moderator)
Okay, here we go:


Step 1: Size, space, stowaway, personal requirements:

I am fascinated by those railroadguys cruising their trains through a great diorama at very little speed. I wanted to convert this idea into a little singlelane track, not to be build to break any speedrecords but to get that recreational flow one tries to get while cruising through scenery. Space is little, as it has to be stowed away in a little space above of my workbench. Therefore the size is thougt to be 250 x 65cm, just big enough to have fun on the one hand but keep it simple and inexpensive on the other.


Step 2: A lightwight frame:
A simple fir-frame will do the job. I used 2.5cm x 5cm, some 90° angles and screws. The track will be supported by the frame later and the frame by the track, thus giving a light and strong construction. Of cause bigger sizes will need bigger wood.


drilling scewholes (about 2.5 to 3mm) will lower risk of fir to break.

Step 3: MDF:
I used 12mm, 9mm would have done the job, too but werent availible at the local woodstore at the moment.
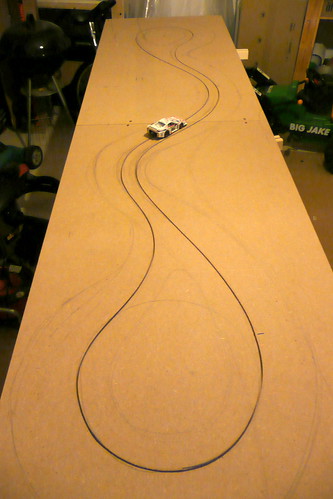
Sketch the road and future slot roughly to get an idea about how it looks. Then use a lexanstripe (see oldslotracer.com -> "Routingkit" for example) to get smoothly flowing lines.


Mark future slot with an marker as this will be your reference for all future steps.


Note, that minimum distance between my slots is 4 cm to avoid tyres loose grip on slot.

Costs: Fir 4Euro, screws and angles taken from my basement-collection, MDF (125x65cm two times) 14Euro. Complete sum so far: 18Euro
Okay, thats it so far. Any thoughts welcome.

Regards Jens
 
#6 ·
I can add some thoughts if you don't mind...

After I had the design figured out and table was built,I covered the table
with brown wrapping paper to start sketching the track on and to figure out
turn widths and where the MDF should be left for scenery areas.Then I
cut out the paper track and laid the sections on the MDF so there would be
less waste.Then the outsides of the paper track were traced and a matt
knife was run over the slot line to transfer it the the MDF.This is easier for
me because I freehand the routing.

 
#7 · (Edited by Moderator)
Hi freaks,

Step 4: Prepare for routing:

Measure the radius of your router, 6.8cm in my case.


Prepare a little piece of wood with exactly this size. Nail down the lexan stripe at a distance of these 6.8cm from marked slot, using the little wood as a guide. Work from hole to hole of the lexan.


This will be the guide for your router.

Step 5: Routing the slot:

Note that your router has a prefered direction of travel. Every other direction works, too, but results are much worser. See Chris Frosts homepage for more Info about this item: http://www.slotcar.org.uk


Once I had found out the "chocolateside" of my router, I marked it on the machine.
Maybe think about eye/ear/dustprotection and maybe fix a vac at the router.

More to follow soon.
Regards Jens
 
#9 ·
Okay, lets go on a bit more:

While routing operate router at highest possible speed but push forward only slowly.


After reaching the end of the lexan take care not to route to the extreme end to keep the precision. Mark the position where you had stopped first routingsection/started the next section because you have to find it again later. It has to be cared for later when sanding the slot. Often the slot in this area gets a bit uneven and has to be sanded well. You can see this on the picture below.


Nailing down lexan for the next section works best if you
1. Put router into the slot; Position were you stopped/you have to start now.
2. Nail down lexanstripe using 3 or more of the old nailholes from before, one nail directly next to the router and then
3. go on like described before


Voila, finished the routing.


Step 6: Sanding the slot.

Sanding the slot has to be done with great care. Especially watch the areas you marked before. Move a slotcar through slot to find rough areas.


Thats it for today. Any thoughts or questions welcome. Happy New Year!
Regards Jens
 
#10 ·
Brilliant Jens,
We've all been there at some stage a really good idea to give others a hand up, if we can.

My first track was with the help of my 12 year old son a joint project back in Feb 2006!


I wish I'd had your advice back then


The problem is every time I see a thread like this I want to build another
NO!

Happy New Year to you too.
 
#12 · (Edited by Moderator)
Hello and a happy new year to everybody.

Hopefully your headache has passed and you are fit for some further trackbuilding.
Thank you very much for your comments and input.


Step 7: Some thoughts about lines and cutting:


There are several kinds of lines that have to be taken care for before cutting the track:


-The slot as a line that guides our car,
-The road you draw and paint later (black lines),
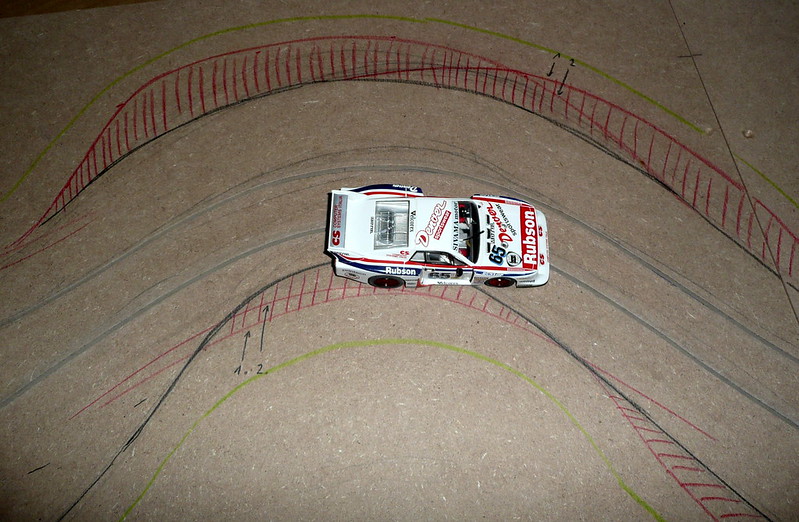
-The (red) lines the car "draws" at the inner side of a hairpin when operated at very slow speed and the line at the outer side of the curve when drifting and sliding around the corners at high speed (Depending on the direction you travel there are two of them at the outer and the inner side of the curve).
-Last but not least there is a fourth kind (green) where you cut it wit the saw.

The green one is depending on the others and the extra space needed for the red lined areas shouldnt be forgotten while cutting! Otherwise the car scratches the scenery here later.


You can see that there is a lot of extra space needed, especially when building narrow roads.
The green line/sawcut gets an additional distance of about 2cm from red areas. This extra space is needed later to fix the scenery.

Aaaaaand cut! No worry, everything will be fine.


This is what the saw left over...

Regards Jens
 
#15 ·
Good Thread, hopefully will encourage more people to take this route !


A few points I would like to add:

You mention full speed on the router ..... Use quality router bits and note the max rpm often stamped on them or the package, in my case I had to run about 2/3rds of my routers max speed IIRC.

If doing a multi-lane track, route the centre lane first, and make a small jig with a couple of pins set in the base a the spacing you want from the bit, then its easier to follow the first line evenly, of course any points you wish to deviate from a fixed spacing you can do with the lexan strip or whatever you use (I used small diameter plastic tiolet tubing with holes for fixing drilled in).

Example:


Dont forget to allow room for sliding cars, take the longest car you have with a good guide rotation, place it in a slot on a straight bit and turn it as far as the guide allows.
Measure the distance in a right angle from the slot, to the cars furthest point and allow at least this amount on the outside of any bends werever you can (sometimes room or desired design /scenery dictates this isn't always possible). More subtle curves wont need as much sliding room.

@ Ian ... you know you want to ... get to it
 
#16 ·
Hello Jens,

great track.

Beautiful sweeping curves and with the wheels on the curpes.

If I stretch the guide so see, so you can connect this part time as a module to a different route.
Similarly, it shall come in my parking lot also.

I'm looking forward to new pictures.


Regards Stefan
 
#18 · (Edited by Moderator)
Thanks, guys for the kind words and input.

Step 8: Connecting the frame with the track and first thoughts on shaping the scenery.

At least now you should have a rough idea how your scenery might look like and what theme you would like to choose. Older roads and streets often follow the scenery while newer ones or designed modern-days-raceway mostly wont. Keeping this in mind will make your scenery look perfectly realistic. A hairpin on an old targatrack for example would have only been build as a hairpin if there was a reason to do so. Bridges in earlier times were build as short as possible, while nowadays a bridge might be very big just to keep the road as flat as possible; ...just some thoughts.

I decided to do something like a seaside theme, maybe a little bridge and/or a little lighthouse. I wanted one side of the track to be a bit elevated because I like cars going up or coming down little hills. The scenery is thought to be kept simple and nearly monocromatic to give some surrealistic look and focus on the cars.

First of all the track has to be connected with the frame. Some simple pieces of fir will do the job. The result is very stable and strong eventhough it is relatively lightwight.
Respect the fact that MDF doesnt allow endless bending. It suddenly breaks without warning and repairing is nearly impossible. If you need big amounts of bending for hairpins/banking or steep elevations you have to cut the track from the backside. See Lufs instructions for this.. Take care for the cars bottom-clearance.


Screws are usually fixed directly through the tracks surface. Make sure the srews are sunk down under the surface to keep them from making bumps on the track.

Later they can easily be covered with some filling paste and sanded smooth.

Any thoughts and ideas wellcome! Regards Jens
 
#19 · (Edited by Moderator)
Step 9: Shaping the scenery.

The backside of the track is planked with 6mm MDF. I had some rests from the other tracks and I bought 2 rest-pieces of 50cm x 100cm, each one 50cent.


some steel-mesh (about 1,20 Euro/m) or alu-mesh or whatever you can get is used to shape the later looks of scenery. Even stripes of cardbord can be used - like for example Bill (jmswms) did.
Stuff is stapled directly onto the MDF. Keep areas for sliding and the inner side of the curves free.

The front of the track in my case is kept flat to be shaped as water or beach later. Some of the thin MDF mentioned above is used to form the bottom here, too.


Some freaks use Styrofoam as a base for scenery, too. Depends on what you prefer or can get cheaply. Nearly everything works.

Costs so far: 1Euro for additional thin MDF, 2Euro for staples, 2,50Euro for Steelmesh. Alltogether sum: 18Euro + todays 5,50Euro = 23,50Euro

Regards Jens
 
#22 · (Edited by Moderator)
Hi everybody!

Step 10: Coverage of the steel-mesh: Plastering

First of all check the shape of your scenery, all elevations of the track and the total look once more. It is your last chance for changes.

Shaping the scenery and covering the mesh (as well as the way you do that) depends on the way you prefer.
A simple way is to cover it with papermache, some other guys use insulating-foam and cut into shape after (very lightwight). I prefer the good old and dirty plaster-method: You simply get some kitchen-paper, cut it into smaller pieces (I prefer stipes of about 15 x 30cm) and bath them in a thin (almost watery) solution of plaster one after the other. Put down on the mesh in 2 to 3 layers they give a stable and relatively lightwight coverage of the mesh. Work with little amounts of plaster and in little areas. If you want to build a wintertrack you might stop scenery-works here
.


slowly it starts to look like a track...winterwonderworld for now.


Note: while plastering I kept the rest of the plaster which became too hard to work with, put it aside and pressed with the hands to form little stones and rocks. I have used them as a first step to a more detailed scenery. (Sorry, untill now I have no idea how to get them colored, ...but you know: Everything will be fine in the end


Hope you enjoy! What else methods can be used to shape scenery? Any input welcome.

By the way: Many freaks prefer painting/coppertaping the track before starting with scenery. There have to be added 3,50Euro for the plaster and 0,50Euro for one roll of kitchenpaper: The total sum for now eventually is 27,50Euro

Regards Jens
 
This is an older thread, you may not receive a response, and could be reviving an old thread. Please consider creating a new thread.
Top